20 Sept 2026 · Ger
Spoke Calculator updates: tension balance and custom tables
On this page
My Dartmoor rim measurements and LyN_Suiza’s feedback on ForoMTB have guided the latest changes to Spoke Calculator. The feedback helped me give tension balance and the information you need beside the tensiometer more space in the tool. Thanks for taking the time to work through it.
To measure the Dartmoor, I used a 184 mm spoke and a 290 mm spoke, with a 68 mm gap between the inside faces of their bends. That gave 542 mm ERD, with the tips flush with the top of the nipple heads. I’ve put the method and photograph in the ERD measurement guide.
For the tension screenshots, I’ve chosen example values that make the comparisons easy to follow. The Dartmoor measurements are in the guide linked above; the data in these screenshots is for explaining the app only.
Rim offset now asks for distance and direction
The offset orientation used to follow the hub geometry automatically, which could be confusing when changing measurements. I’ve put that choice beside the field: for an asymmetric rim, you specify the distance and which side the spoke holes sit towards.
In the length calculator, enter the magnitude without a minus sign, for example 1.5 mm, then choose left or right. Both sides are viewed from the rider’s position. Keep that viewpoint when reading the diagram or turning the wheel around in the stand.
The diagram shows the selected displacement. Check that it matches the actual orientation of your rim, including when you’ve selected a catalogue entry. Your chosen direction stays the same when you select another hub. When opening an older file, the app adapts its offset convention while preserving the geometry used to calculate the original lengths.
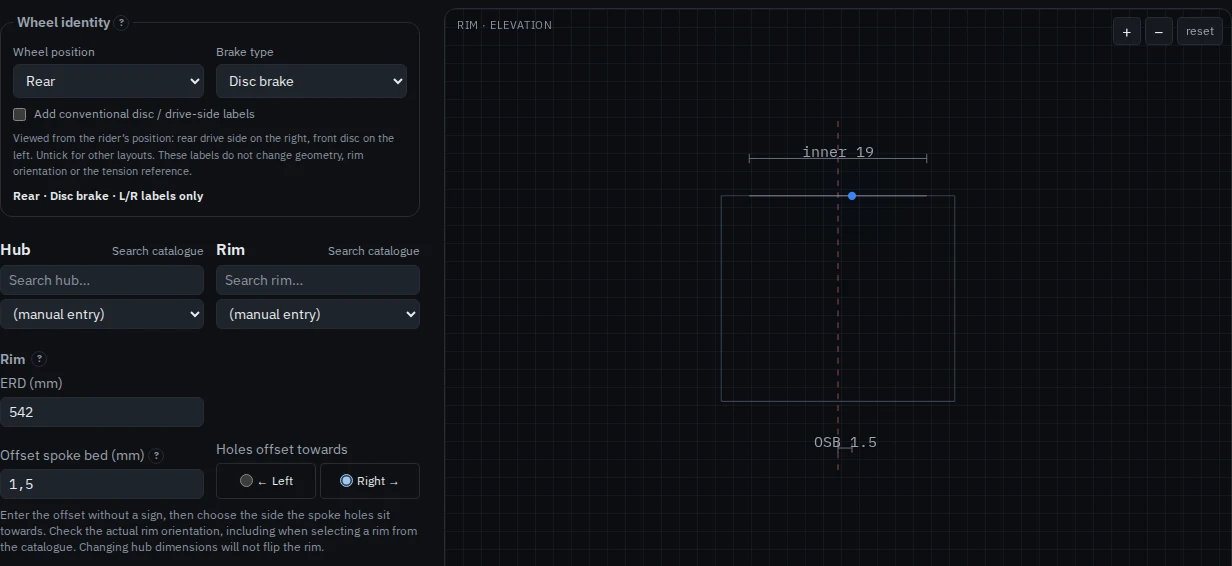
Reversing the offset can still give the same commercial spoke length if both results fall within the same rounding step, even though the raw values for each side have changed. Check both to see the effect of the orientation. Before ordering, verify ERD, the nipple reference and thread engagement.
Each build carries its wheel identity
When you return to a saved build, it helps to have its name and know whether it belongs to the front or rear wheel. You can now record the brake type too and keep those details alongside the measurements.
You can add conventional drive-side and disc-side labels, or keep just left and right. Use the generic labels for a layout that does not follow those conventions. The rider’s position remains the physical reference.
The name and context carry over when you select Tension this wheel from the length tool. Changing the label from rear to front leaves your measurements and reference-side setting as you entered them. Check those when you reach the tension tool, then set the targets according to the geometry and your rim maker’s guidance. The field starts at 110 kgf as a provisional value awaiting that check.
Balance and target tension are separate checks
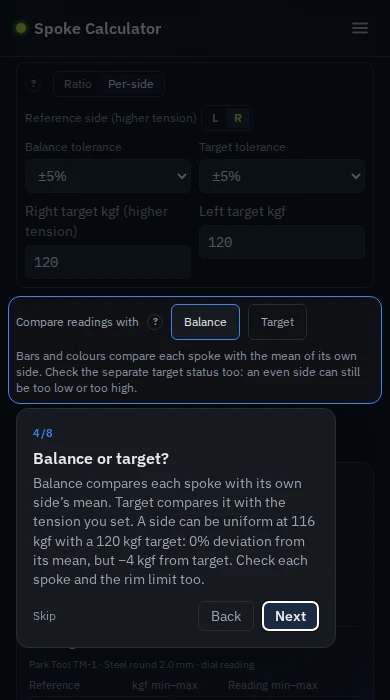
The Balance / Target selector lets you compare each spoke’s tension with its side’s mean, then with the tension you’re aiming for. The radar follows your choice, while the summaries keep both checks visible. You can set one tolerance for balance and another for the target.
Here’s a software example. Suppose 16 spokes on one side are all at 116 kgf, with a 120 kgf target:
- That side’s mean is 116 kgf. Every spoke differs from it by 0 kgf and 0%.
- Against the target, each spoke is 4 kgf below, approximately −3.3%.
- An illustrative ±5% target band runs from 114 to 126 kgf. The 116 kgf readings are within it.
At 116 kgf, this example already meets both bands. Chasing exactly 120 would mean adding tension after reaching the chosen margin. With different readings, you might find a very even side that is still too loose or too tight; the target status stays visible while you view Balance to help you spot that.
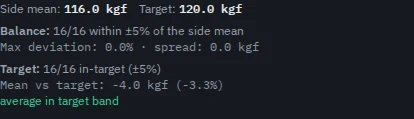
Balance uses that side’s own mean, keeping the two sides of a dished wheel separate. Check the individual rows as well: a suitable mean can hide spokes that are too high or low. Missing readings or conversion errors leave the mean marked provisional.
Working ranges show kgf and instrument readings
Below each side’s summary, you’ll find the working limits already converted to your tensiometer’s scale. One row covers the band around the target and the other covers the band around the mean, with kgf limits and equivalent readings for the selected instrument and spoke profile.
Using the Park Tool TM-1 table for round 2.0 mm steel, the example above gives:
| Reference | Illustrative band | kgf limits | Displayed readings |
|---|---|---|---|
| Target: 120 kgf | ±5% | 114–126 | 24.539–25.4 |
| Side mean: 116 kgf | ±5% | 110.2–121.8 | 24.247–25.12 |
To calculate those windows, the app first applies the percentage to tension, then looks up each endpoint on the conversion curve. The order matters because the slope can change between segments. Applying 5% directly to the instrument reading can give a different range.
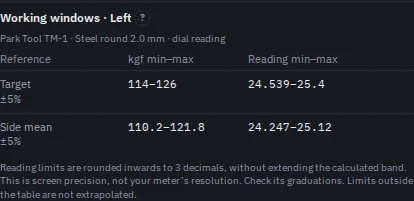
Reading limits are rounded inwards to three decimal places to keep them within the calculated band. When measuring, work with the graduations on your actual meter: those decimals may be finer than you can read. On decreasing scales, larger readings can mean lower tension; the app identifies this. If an endpoint falls outside the table, its kgf limit stays visible with a notice that the equivalent reading is unavailable.
You can bring your own table
My tension tables is for an instrument and spoke pair that needs its own conversion. Open the panel in the tension tool, paste two columns from a spreadsheet, or import CSV, TSV or JSON.
Before using the table, check the instrument name and exact spoke. Specify the tension units, kgf or N, and check the decimal format. Add the source, contributor and revision. If the curve belongs to a particular individual meter, record that. Calibration can differ even between spokes with similar dimensions.
In the preview, you can inspect the points and source before selecting the table. The contributor supplies the attribution, so check the source yourself: Spoke Calculator has not reviewed the table. If you save a new revision, the previous one stays available and builds using it retain their conversions.
The following screenshot uses invented points solely to demonstrate importing. Do not use them to measure a wheel.
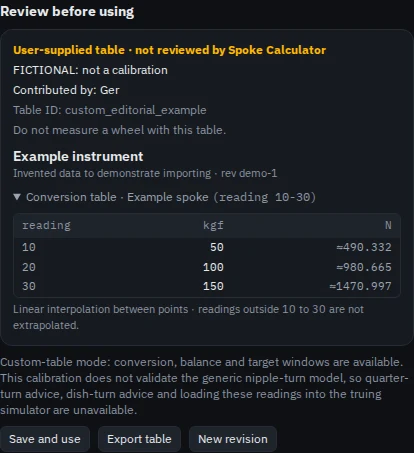
With a custom table, you can convert readings, check balance and view the working ranges. That’s diagnostic mode. Estimating how the wheel changes with a nipple turn would need that behaviour to be validated too. For that reason, turn advice, turn-based dish adjustments and simulator loading are disabled while using these tables.
Save the wheel and find the help again
Builds are saved in your browser, with separate libraries for length and tension. To carry on in another browser, export the JSON or copy the build’s share link. A custom tension table travels with the build, including the exact revision used, so the conversions work even with an empty library at the other end. You can also export the radar as a PNG image to refer to or share; keep the JSON if you want to edit the build again.
I’ve also revised the ? buttons and the How to use guides. Length and tension each have eight steps pointing out the main decisions, including these additions. You can work through the guide while setting up your wheel, then close it and pick up where you left off with your data intact. To explore with a demo, select See an example.
Start with spoke lengths if you are still taking measurements, or open tension if you already have readings. Check the manufacturer’s limit, calibration and physical trueness as you work. If something does not fit your case, tell me which instrument, spoke and measurements you are using. Those specific details help me keep improving the tool.